When you are working on microcontrollers it can be very difficult to know what your code is doing, with MicroPython we can use REPL (Read Evaluate Print Loop) to see the debug output and run python commands in real time. This tutorial will be looking at how you can use a serial connection to take advantage of this powerful debugging tool for any microcontroller running the MicroPython Firmware. MicroPython Forum The MicroPython Language Programs, Libraries and Tools New version of Thonny IDE Discussion about programs, libraries and tools that work with MicroPython.
Programming Raspberry Pi Pico with Micro Python
In this tutorial you will understand how to Program Raspberry Pi Pico with MicroPython. Also you will learn what MicroPython is, how to install MicroPython on Raspberry Pi Pico and how to program Raspberry Pi Pico with MicroPython.
Before that check out our article on introduction to raspberry Pi, So that you can understand this tutorial better.https://youtu.be/Aw1K-szL31Y
What is MicroPython?
MicroPython is a Python Language Interpreter that is developed for Microcontrollers and embedded systems. If you are working in a software domain and never worked on hardware, but you want to write applications for microcontroller based embedded systems, then MicroPython is the best choice.
MicroPython is very similar to Python. If you know Python, then writing code in MicroPython will be easy for you.This tutorial explains Program Raspberry Pi Pico with MicroPython using a windows system.
How to Install MicroPython on Raspberry Pi Pico?
Thonny Python Ide Tutorial
Download MicroPython Binary
To run MicroPython on Raspberry Pi Pico, download the prebuilt binary from the official Raspberry Pi Pico’s website.
click on the “Getting Started MicroPython” tab.
Then download file
Install MicroPython on Raspberry Pi Pico
After downloading the MicroPython Binary, we have to upload this firmware into the Raspberry Pi Pico.First put the Pico in bootloader mode.
means plug-in a micro-USB cable to the micro-USB port of Raspberry Pi Pico. Now, hold the BOOTSEL button on the Pico and plug-in the other end of the USB cable to a USB port of the host computer by holding the BOOTSEL button. then release the button after 2 seconds when the Raspberry Pi Pico appears as a Mass Storage Device with name “RPI-RP2”. When you open it, you will see a text file and an HTML file.
Now, go to the downloads folder and drag-and-drop the downloaded MicroPython UF2 file onto RPI-RP2 device. After copying, the Raspberry Pi Pico will restart and run MicroPython. The mass storage device will disappear after you copy the MicroPython UF2 file. Your Raspberry Pi Pico is now running MicroPython. You are now ready to program Raspberry Pi Pico with MicroPython.
Downloading Thonny
Thonny Ide
how to program Raspberry Pi Pico using Thonny IDE.
Thonny is a simple Python IDE available for Windows, Mac and Linux. The Raspberry Pi OS comes with Thonny preinstalled. Since I am using a Windows system, I downloaded the Windows version of Thonny. An executable called “thonny-3.3.5.exe” is downloaded.
Double click on the downloaded executable and install Thonny. There is nothing special with this installation and it is very straight forward. Optionally, you can select to create a desktop shortcut.
The Toolbar: Contains icons for saving, running and stopping the programs.
The Script Area: This is where you write the Python Programs.
The Shell: The Python Shell is an interactive REPL (Read-Evaluate-Print-Loop) block where you can give individual commands to the interpreter and it will execute them.
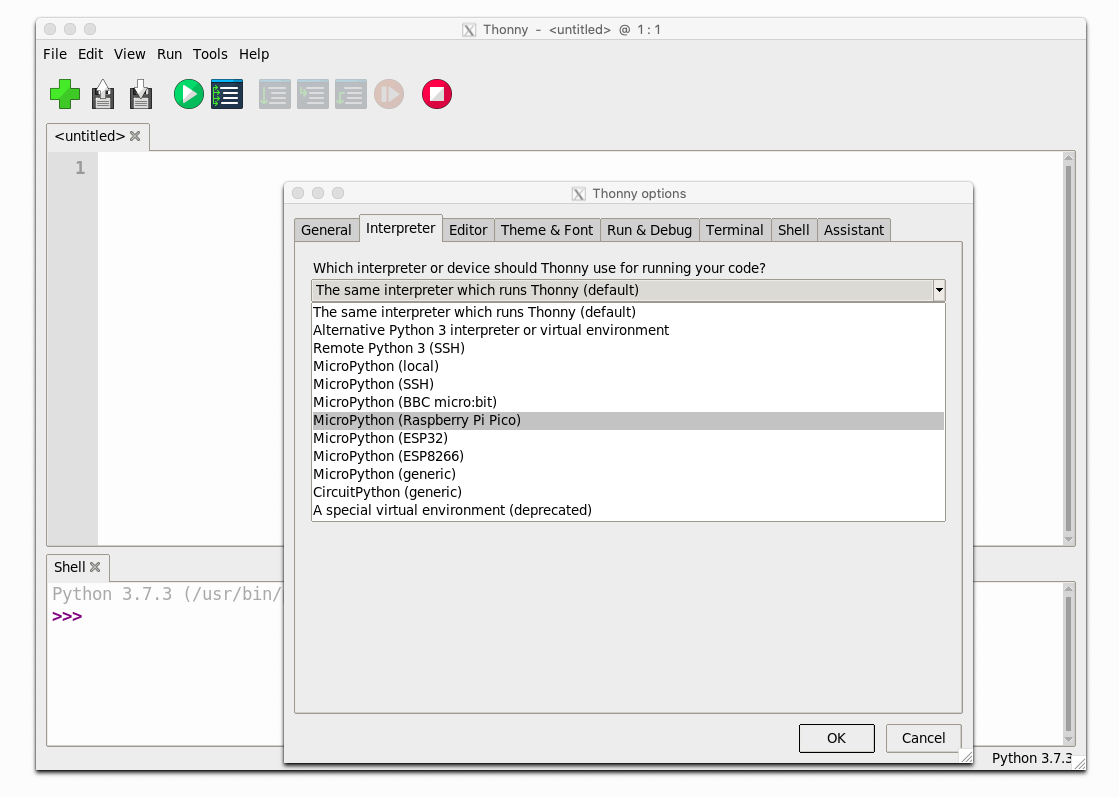
The Interpreter: Select the right interpreter from the bottom right of the IDE.


In the Shell, type the following next to “>>>” symbol and hit enter.
print(“Hello, World!”)
This is an instruction to the MicroPython Interpreter running on Raspberry Pi Pico. Up on receiving this command, the MicroPython will respond with the
message “Hello, World!” and prints it on the shell itself.
Give a name to the file and click on OK. I gave it as “main.py”.
X ray diffraction explained. Then Click on ‘Run’ icon and you can see the LED Blinking.


Conclusion
In this tutorial, you learned how to program Raspberry Pi Pico with MicroPython. then little bit MicroPython, how to Install MicroPython in Raspberry Pi Pico, Programming Raspberry Pi Pico with MicroPython and Thonny IDE and Blinking LED

댓글